
AutoCAD Mechanicalで寸法値を変更してストレッチしてみました!
図形のサイズを変えことができる[ストレッチ(STRETCH)]コマンドを使ったことはありますか?
このコマンドは変更後のサイズを基点/目的点の座標で指示します。長さ寸法「100」を「150」に変更したいときも座標値で位置を指示しなければならず少し面倒です。長さ寸法線の値を変更するだけで図形サイズを伸縮できるほうがわかり易いですよね。
そんなときはAutoCAD Mechanical(機械2次元CAD)の[片側/対称ストレッチ(AMDIMSTRETCH)]コマンドを使うのがいいと思います。寸法値で図形のサイズを伸縮することができました。
1.コマンドを実行する

[片側/対称ストレッチ(AMDIMSTRETCH)]コマンドは、リボンメニューの[注釈]タブの[寸法記入]パネルのなかにありました。
2.寸法タイプを選択する

ストレッチする寸法線の種類[片側][対称]が用意されています。
片方向にストレッチさせたいので[片側]を選択しました。
3.寸法値を選択する
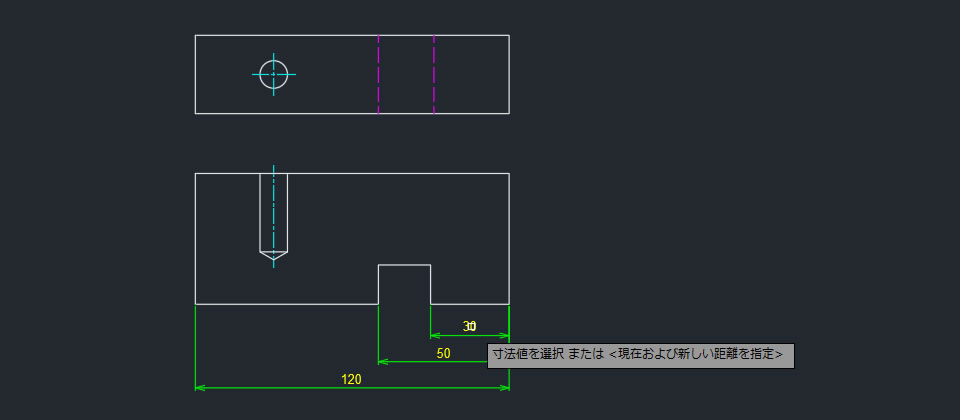
長さを変えたい寸法値を選択しました。
4.寸法値を変更する
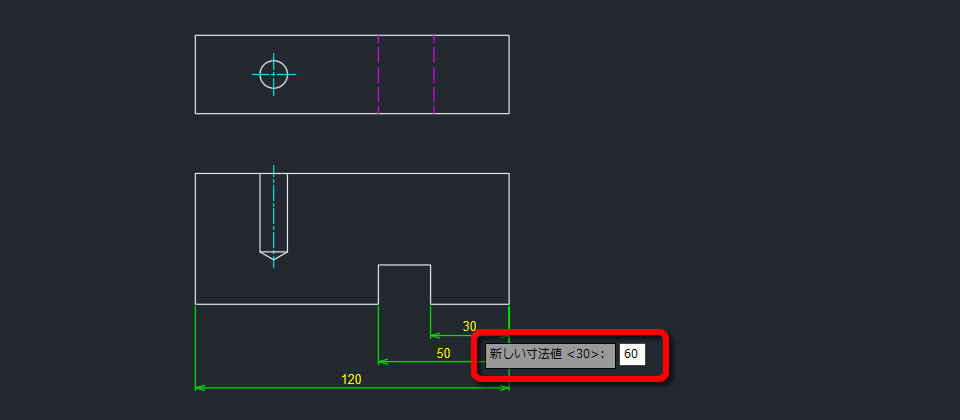
ストレッチ後の長さ寸法の値を入力しました。
5.図形を選択する

ストレッチしたい箇所のみを囲むように図形を選択しました。
図形全体を囲むと上手くいかないので注意が必要です。
6.図形の大きさが変わる
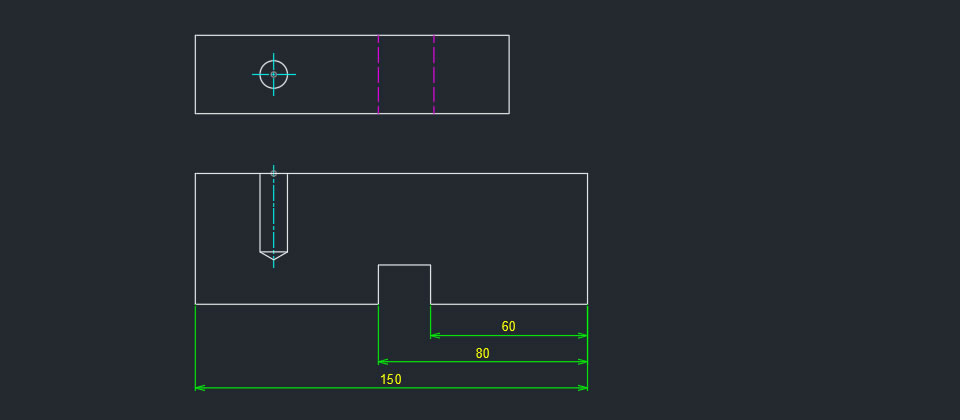
入力した寸法値で図形の長さを変更することができました。
【動画で見てみましょう】
参考記事
Warning: file_get_contents(): https:// wrapper is disabled in the server configuration by allow_url_fopen=0 in /home/ccube/cadcam.ne.jp/public_html/cad100blog/wp-content/themes/cad100blog-2024/functions.php on line 1040
Warning: file_get_contents(https://www.youtube.com/watch?v=YfC8OPaxfuU): Failed to open stream: no suitable wrapper could be found in /home/ccube/cadcam.ne.jp/public_html/cad100blog/wp-content/themes/cad100blog-2024/functions.php on line 1040


AutoCAD Mechanicalで対称図形を寸法値でストレッチしてみました! | CAD百貨ブログ- CAD機能万覚帳 -
Warning: file_get_contents(): https:// wrapper is disabled in the server configuration by allow_url_fopen=0 in /home/ccube/cadcam.ne.jp/public_html/cad100blog/wp-content/themes/cad100blog-2024/functions.php on line 1040
Warning: file_get_contents(https://www.cad100.jp/autocad/): Failed to open stream: no suitable wrapper could be found in /home/ccube/cadcam.ne.jp/public_html/cad100blog/wp-content/themes/cad100blog-2024/functions.php on line 1040